Ask where to put your strobes and you will be told, correctly, to keep them out of the water in front of the lens. Backscatter’s own guide on the subject puts it plainly: the best way to avoid backscatter is not to light it in the first place. Move the strobes wide, push them up, let only the edge of the beam reach the subject, and the lens sees shadowed water rather than a field of lit particles.
All of that is true. It is also advice from a decade when a frame full of white specks meant an evening with the clone stamp, and the calculation has changed since. What has not changed is that light kept out of the water column is light kept off the sides of your subject, and on a hairy frogfish, a squat lobster or a nudibranch with translucent rhinophores, the sides are the entire photograph.
What safe lighting takes away: the classic 10-2
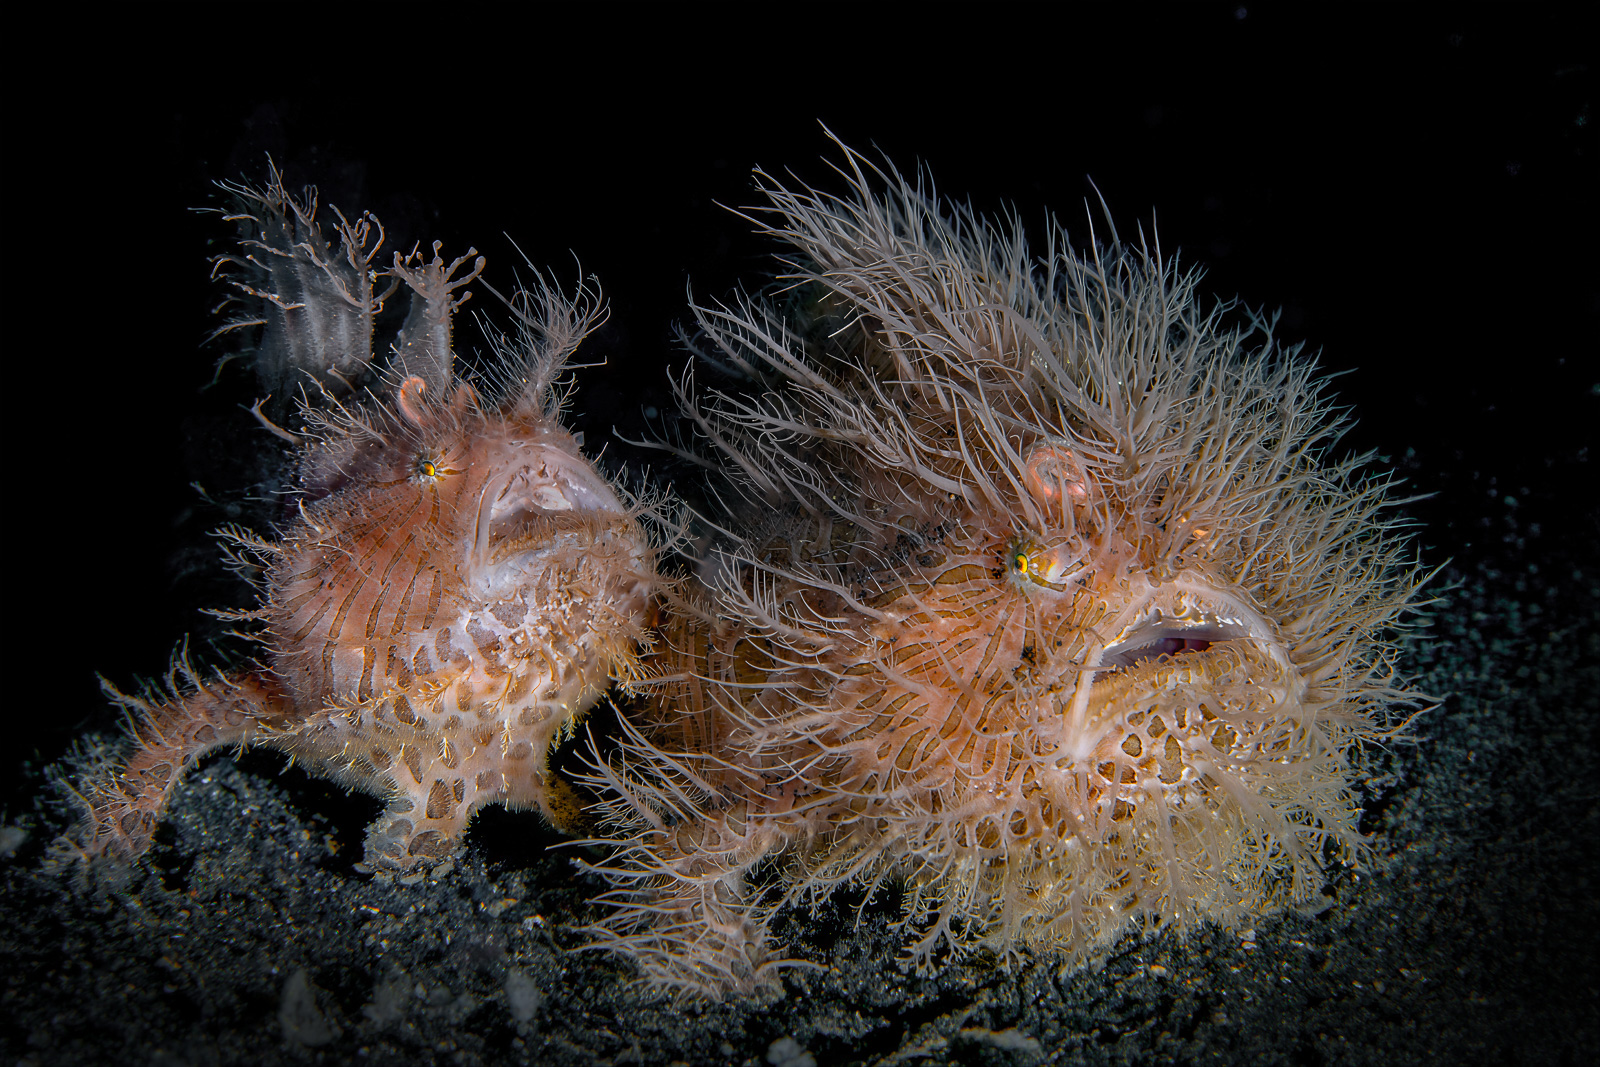
Texture is a property of light arriving at an angle, not of the subject, and it disappears the moment the light comes from the same place as the lens. Flat frontal light gives you an accurate record of colour and shape with the surface information washed out of it. Move the source so it rakes across the subject instead, and every filament casts a shadow the length of itself.
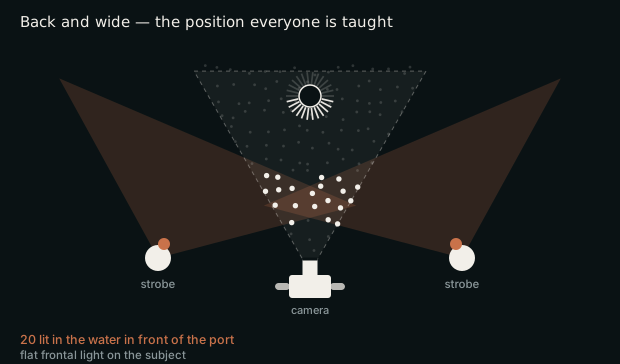
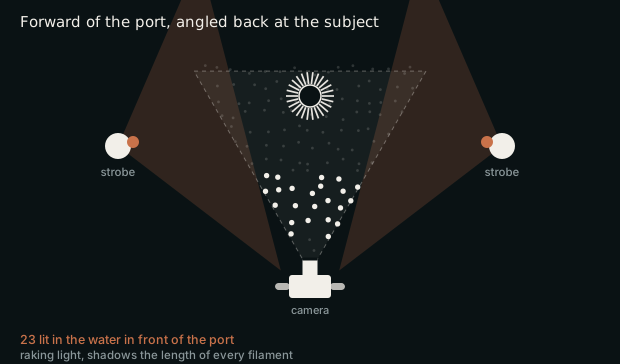
The position everyone is taught is the clock one: strobes at 10 and 2, up behind the handles and angled down, or 9-3 level with the housing for a wider scene. On a macro rig the same instinct arrives in a more specific form: heads close to the port and angled slightly out, so the beams cross a good ten inches in front of the lens and leave a deliberate unlit cone between port and subject. That cone is the whole point of it: nothing in the water you are shooting through gets lit, so nothing in it shows up. It is a good rule and it is the right rule most of the time. It also puts the light where the lens already is, which is why it gives you an accurate record with the surface information washed out of it. Getting texture instead means the strobes come forward, past the port, one on each side of the subject rather than behind your handles, angled back towards it. You are now lighting the column of water the lens is looking through, which is exactly what you were told not to do. This is the cross-over position, or cross strobe: both heads out in front of the port, turned to face each other at roughly ninety degrees and angled slightly back towards the housing. Set them at unequal power, and unequal by a lot: one carrying the exposure, the other turned right down as a gentle fill. Two thirds of a stop is not enough to be worth doing: the frames on this page run about two and a half stops apart, one at +1⅓ and the fill at −1⅓. That gap opens the shadows without filling them, and the subject stops sitting on the frame and starts standing in it.
How much this actually costs you
The diagrams above are not illustrations. The particles are a fixed field of scatter and each one is drawn bright when it falls inside a strobe beam and inside the lens cone, in the nearer half of the water between the port and the subject, which is where backscatter is born, because a particle a few centimetres off the port is large, bright and out of focus, while one near the subject is small and often hidden behind it.
Counted that way, the safe position puts 20 lit particles in the near column and the forward position puts 23. That is a smaller penalty than the received wisdom implies, and it is the honest number rather than the one that would make the argument sound better. At macro working distances there is very little water in front of the port to light. The reason the old rule feels so urgent is that it was formulated for wide angle, where the same geometry has three metres of water in it instead of fifteen centimetres.
Removing it stopped being the expensive part
Three particles is not nothing, and over a reef rather than black sand it is more than three. The question worth asking is no longer how to avoid them but what they cost to remove.
BackscatterXTerminator is a Photoshop plugin from Erin Quigley at GoAskErin. It sells for 179.95 US dollars and it is adapted from RC Astro’s StarXTerminator, which is an astrophotography tool built to remove stars from a night sky. A backscatter particle and a distant star present the same problem to a model: a small bright object sitting on top of image data that has to be reconstructed underneath it. That lineage is the reason it works, and it is worth knowing, because it also predicts where it fails.
It handles a field of discrete specks against reef, sand or open water very well. It struggles where the scatter overlaps the subject, where particles are large and soft-edged rather than pinpoint, and where translucent blobs behave like part of the animal. Run it and then look at the frame at 100 percent, because it will occasionally take something you wanted.
The backstop, and why the same lighting goes flat
Move that subject in front of a coral head, a rock or a wall and the light you carefully put across it comes back at it. Every surface behind the subject is now a reflector: light hits the reef, scatters, and returns into the shadows that were doing the work. The exposure barely changes. The modelling disappears.
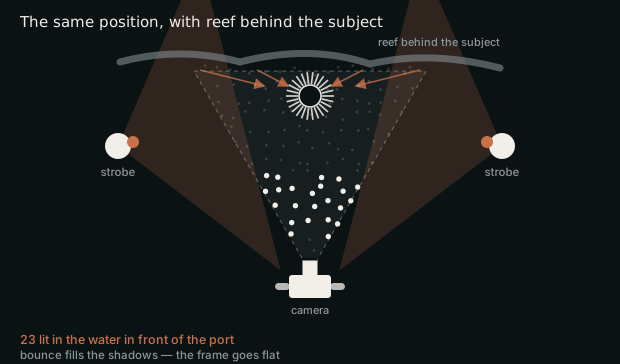
The fix is separation, not power. Move so the subject sits against open water or against something far enough back to fall dark, or drop the strobes lower and rake from underneath the line of the reef, or accept the backstop and change what the photograph is about. A subject against a wall wants context and colour, not texture. What does not work is turning the strobes up, which lights the wall harder and fills the shadows faster than it lights the subject.
12-6, and the two reasons you end up there
Every position on this page is named from the back of the housing, so the clock is fixed to the camera and not to the sea. That produces the first, accidental route to 12-6: rotate the rig ninety degrees for a vertical composition and the arms that were at 9-3 are now one above the port and one below, without your having moved either of them. Worth knowing in both directions: a caption saying 12-6 may just be a portrait-orientation frame, and a diver who rotates mid-dive loses the side light they had set up, because it is now coming from directly overhead and directly underneath.
The second route is deliberate, and it is the one worth learning. Sometimes the subject is not one thing at one height: it is two things stacked, and a horizontal strobe axis cannot reach both. A coral table with sweetlips schooling over it and soft coral growing underneath is exactly that problem. Light it at 9-3 and you get the fish and a black hole beneath them, or the coral and a washed-out sky. One strobe up and one strobe down puts light on both levels in the same frame.
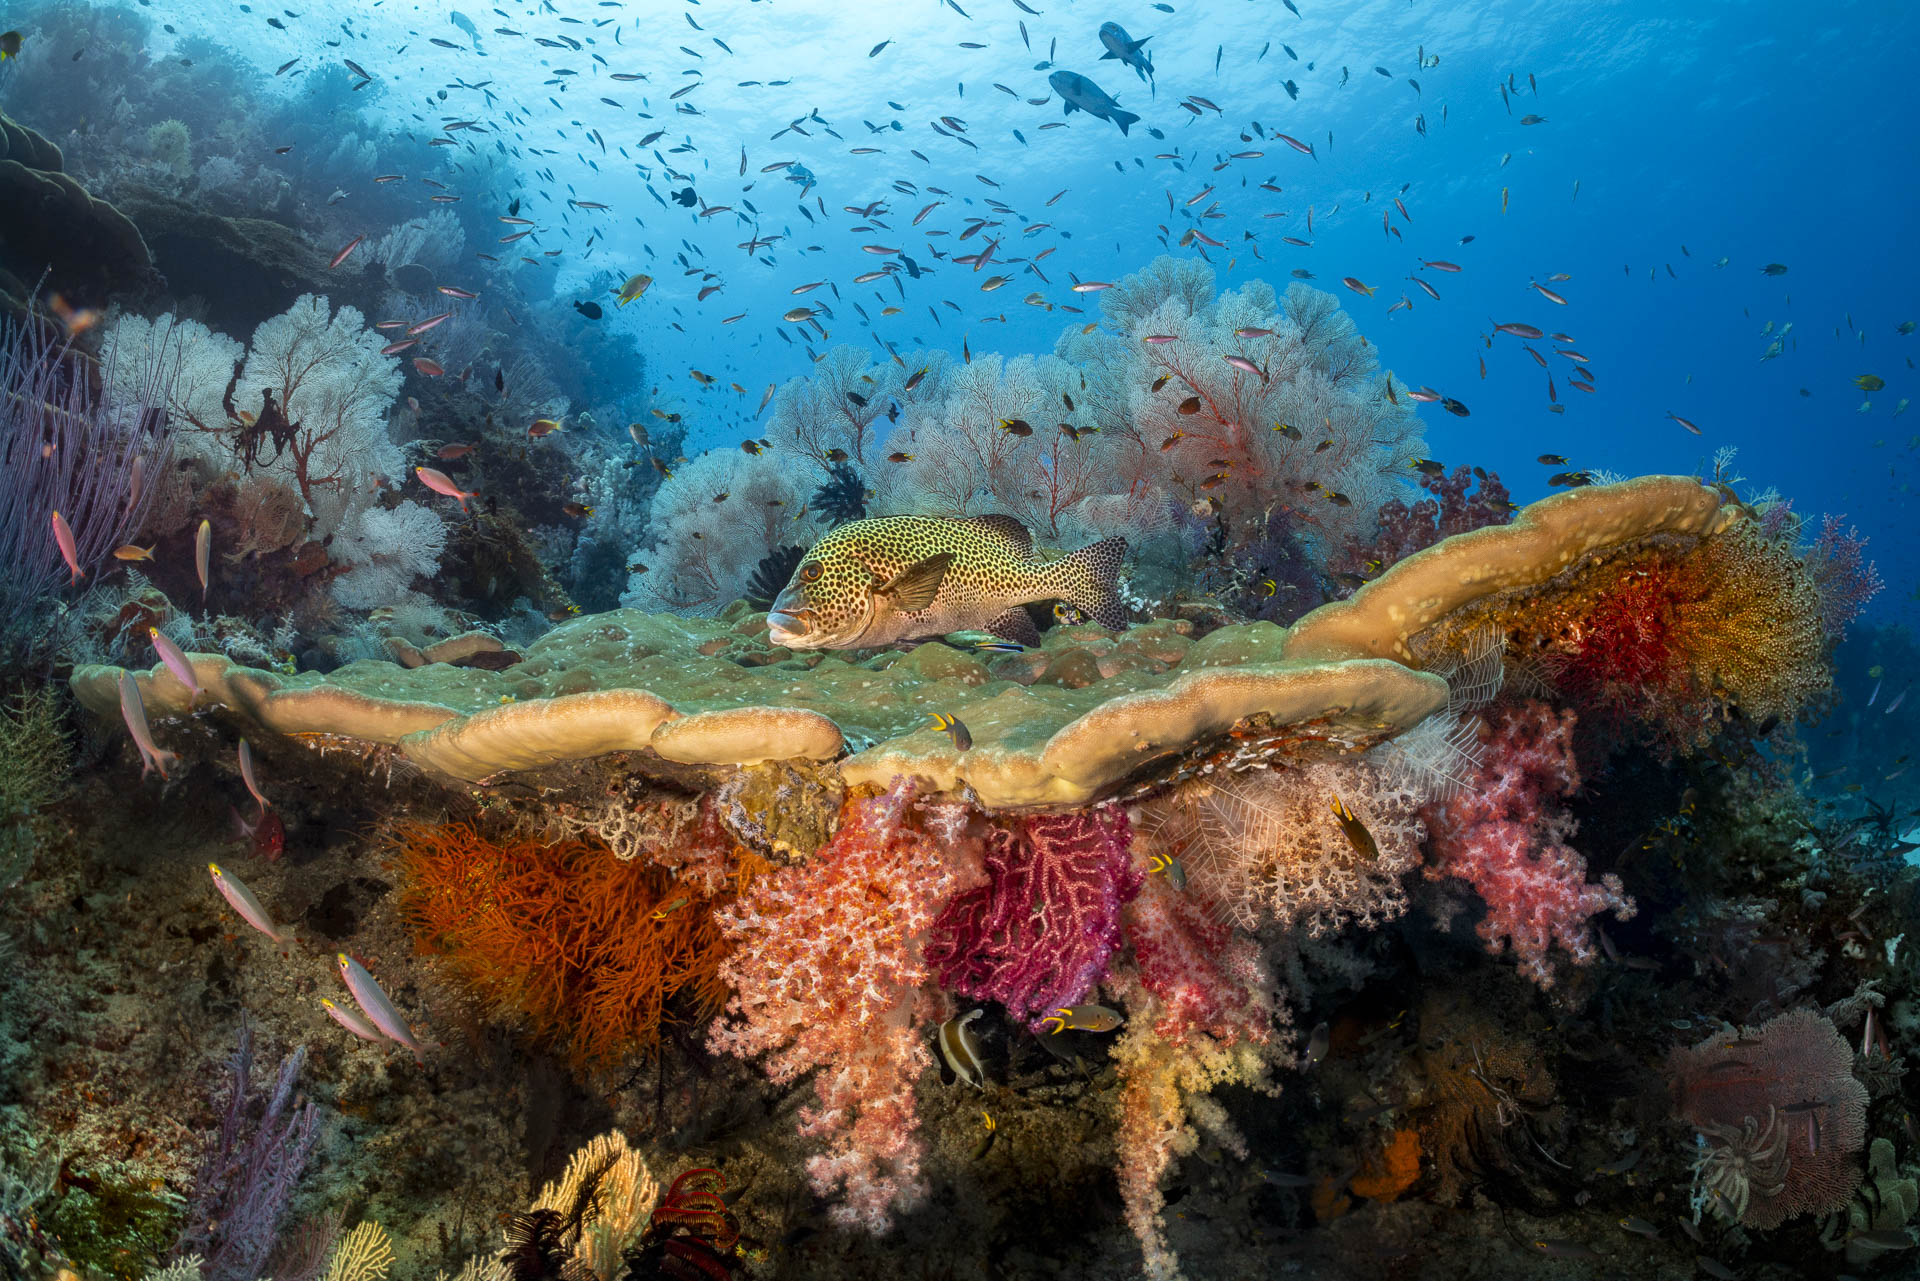
So the question at 12-6 is not “which way up is the camera”. It is whether the picture has two levels in it. Overhangs, table corals, jetty pilings, a wreck with something living under the hull: anywhere the frame is stacked rather than spread, the strobe axis should be stacked too.
When to keep the strobes back, and when 9-3 is the right answer
This is a macro technique and it does not travel. Push both strobes forward on a wide-angle scene and you light every particle between you and a reef three metres away, at which point no plugin saves the file. There is more scatter than image. In green water with heavy plankton the same thing happens at half the distance. And where the particulate is translucent rather than reflective, the tools designed for pinpoint stars have nothing crisp to find.
One mechanical thing that matters more the wider you go. When the arms are out at full extension, keep the buoyancy floats on the segment nearest the housing, not out by the strobe head. A float on the far segment sits at the end of a long lever and drags through the water on every turn, and that load goes into the clamps. They creep, and by the third dive the strobes are aiming somewhere you did not put them.
And a fisheye changes the geometry rather than the setting. A lens that sees a hundred and eighty degrees is not lighting a subject, it is lighting a scene, and the strobes have to come off the housing far enough to cover it. That means long arms, and it means pulling them back, behind the port and not level with it, so the beams spread across the frame instead of converging in front of the dome. Forward-and-in is the right answer for a nudibranch and the wrong answer for a reef, and the tell is the same either way: if the near column is lit, the strobes are in the water the lens is looking through.
When the answer is no strobe at all
There is a distance past which a strobe stops being a light source and becomes a problem. If the subject is further away than the beam can reach, a manta at eight metres or a school over a wall, firing anyway does exactly one thing: it lights the particulate between you and the animal. The subject stays as dark as it was and the water in front of it does not. Switching the strobes off is not a compromise there, it is the correct exposure.
What you give up is texture, and it is worth being blunt about how much. Ambient light almost never produces texture, because it arrives from above and lands on the tops of things, which is the same reason a snoot from directly above describes the top of an animal rather than its sides. The exception is real but narrow: at sunrise and sunset the light comes through the water close to horizontal, rakes across the reef the way a strobe forward of the port would, and for that half hour ambient will do something no midday sun can. Plan the dive for it or accept a flatter frame.
The old rule is right for those frames. Get the strobes up, angle them down, let the lens look at shadow, and shoot close-focus wide angle so there is less water in the way. Keep both approaches and choose between them at the subject, rather than adopting one and calling it a style.
The one number underneath all of this: where the beams cross
Everything above is really one variable wearing different hats. Two strobes throw two cones of light, those cones meet somewhere, and the distance to that meeting point is the setting you are actually choosing. Angle sets it coarsely. Arm length sets it precisely, and arm length is the control almost nobody talks about.
Get it wrong in the obvious direction and the beams cross in the water in front of the animal, which lights the particulate and not much else. Get it wrong in the other and they cross behind it, which is what happens when somebody puts a wet dioptre on a rig still set up for an ordinary macro subject: the strobes are aimed at a point the animal is nowhere near, and the frame comes back dark with a bright patch behind the subject.
The two distances are the only measured figures in that table. The first is derived from Nauticam’s own port chart; the second is the long-standing rule of thumb. Everything else is relative, because it depends on your arms, your ports and how close the animal lets you get.
The practical version is shorter than the table. When the subject gets smaller, bring the strobes in and shorten the arms. When it gets bigger, push them out and lengthen them. Same angle, different reach. If you change lens class and do not move the arms, you have changed the picture without meaning to.
A black background without buying anything
The snoot section below is the deliberate version of this, and it is not the only way in. Turn the strobes back towards the housing, far enough that you are half lighting your own rig, and only the outer edge of each beam reaches the subject. The centre of the beam, the part with the range to reach whatever is behind the animal, never gets there. The subject is lit by the fringe and the background stays where it started.
It is fiddly, and it is fiddly in a useful way: the meeting point is now a couple of centimetres wide, so small changes in arm angle move it a lot. It also only works if there is genuinely nothing close behind the animal. A black background is negative space first and lighting second, and no strobe position rescues a subject sitting on a reef. Get under it and shoot up into the water column if you have to.
The same move scales to wide angle, where it is the reverse of everything the front of this article argues for: heads angled back at the dome, diffusers off, close-focus wide angle. The subject is lit and the water behind it is not.
Bunny ears: single for WAM, double for a horizon
A bunny ear is a strobe stood straight up, vertical off the top of the arm. There are two of them and they are not interchangeable.
Double bunny ear, both strobes vertical, is for shooting out towards a horizon in the water. It looks odd on the boat and it is the position that throws light the furthest forward; nothing else reaches.
Single bunny ear is for wide angle macro, or WAM, which is a different thing again from either macro or wide angle. You get as close to a small subject as a wide lens will focus, so the animal is sharp and the whole scene comes in behind it. At that range the strobes want to be at 12-3 or 12-9, slightly behind the housing, and the reason is a trap: at 9-3 pulled back behind the housing, the housing itself throws a shadow onto the animal you are inches from.
So: one strobe straight up and aimed down at the subject. Being tall it casts a wider beam and picks up less of the particulate between you and the animal. The second goes to 2, 3, 9 or 10 and lights the scene rather than the subject, as much or as little of it as you want.
Light through the subject, rather than onto it
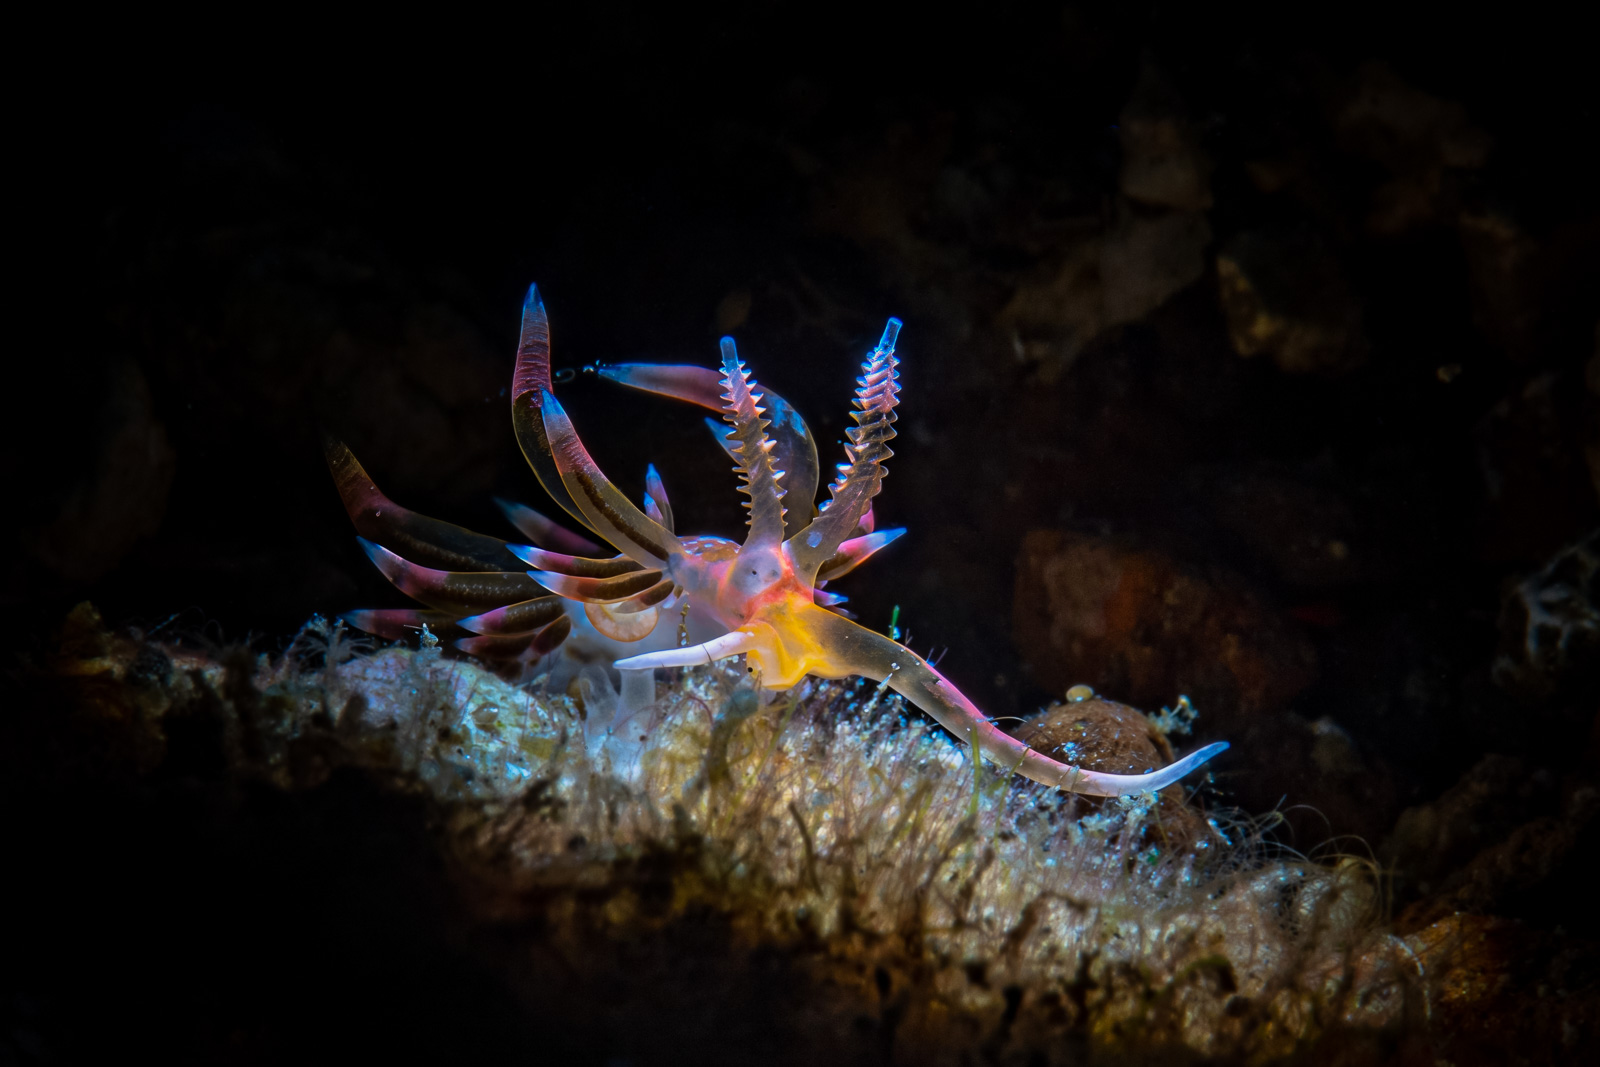
Everything above assumes the light and the lens are on the same side of the subject. Put the strobe behind it and a different property comes forward. Anything translucent, the cerata of an aeolid nudibranch, a jellyfish bell, the fin of a juvenile fish, a tunicate, stops reflecting light and starts transmitting it, and internal structure you cannot see under any amount of front light becomes the photograph.
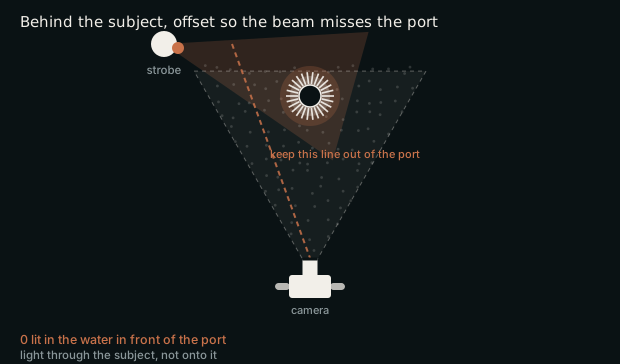
Three things make it work. Get the strobe behind and off-axis, so the beam passes the subject and continues away from you rather than into the port. Aim it tightly: a snoot, an optical snoot, or at minimum a strobe turned in hard, because a wide beam behind a subject is a flare gun pointed at your dome. And expose for the transmitted light, which is one to two stops down on what the same strobe would give you from the front, so the reading you take from the front is not the one you want.
The sun does the same job on a larger scale and costs nothing. Matty Smith’s Orbital is a white-spotted jellyfish shot from below against Snell’s window and rotated end over end, so the bright circle of sky reads as a planet and the animal reads as a spacecraft in front of it. There is no strobe doing the work there. It is the same decision, put the source behind the subject and photograph what comes through, taken with the only light source big enough to backlight a whole sky.
The other way to get texture is to take light away
A snoot is a tube that reduces the beam to a pool a few centimetres across. A light shaping device, Retra’s LSD or any of the optical snoots, does the same with a lens rather than a restriction, so you keep more output and get a defined edge you can aim.
What either one buys is not the black background, though that is what most people notice first. It is the falloff. When light reaches one part of a subject and stops, the eye reads the gradient as form, and detail you would never see under even illumination becomes the point of the photograph. The trade is that you are now lighting something you cannot fully see, in the dark, often at a working distance of centimetres, and the first several dives with a snoot produce almost nothing. That is normal, and it is why most people abandon it in the first week.
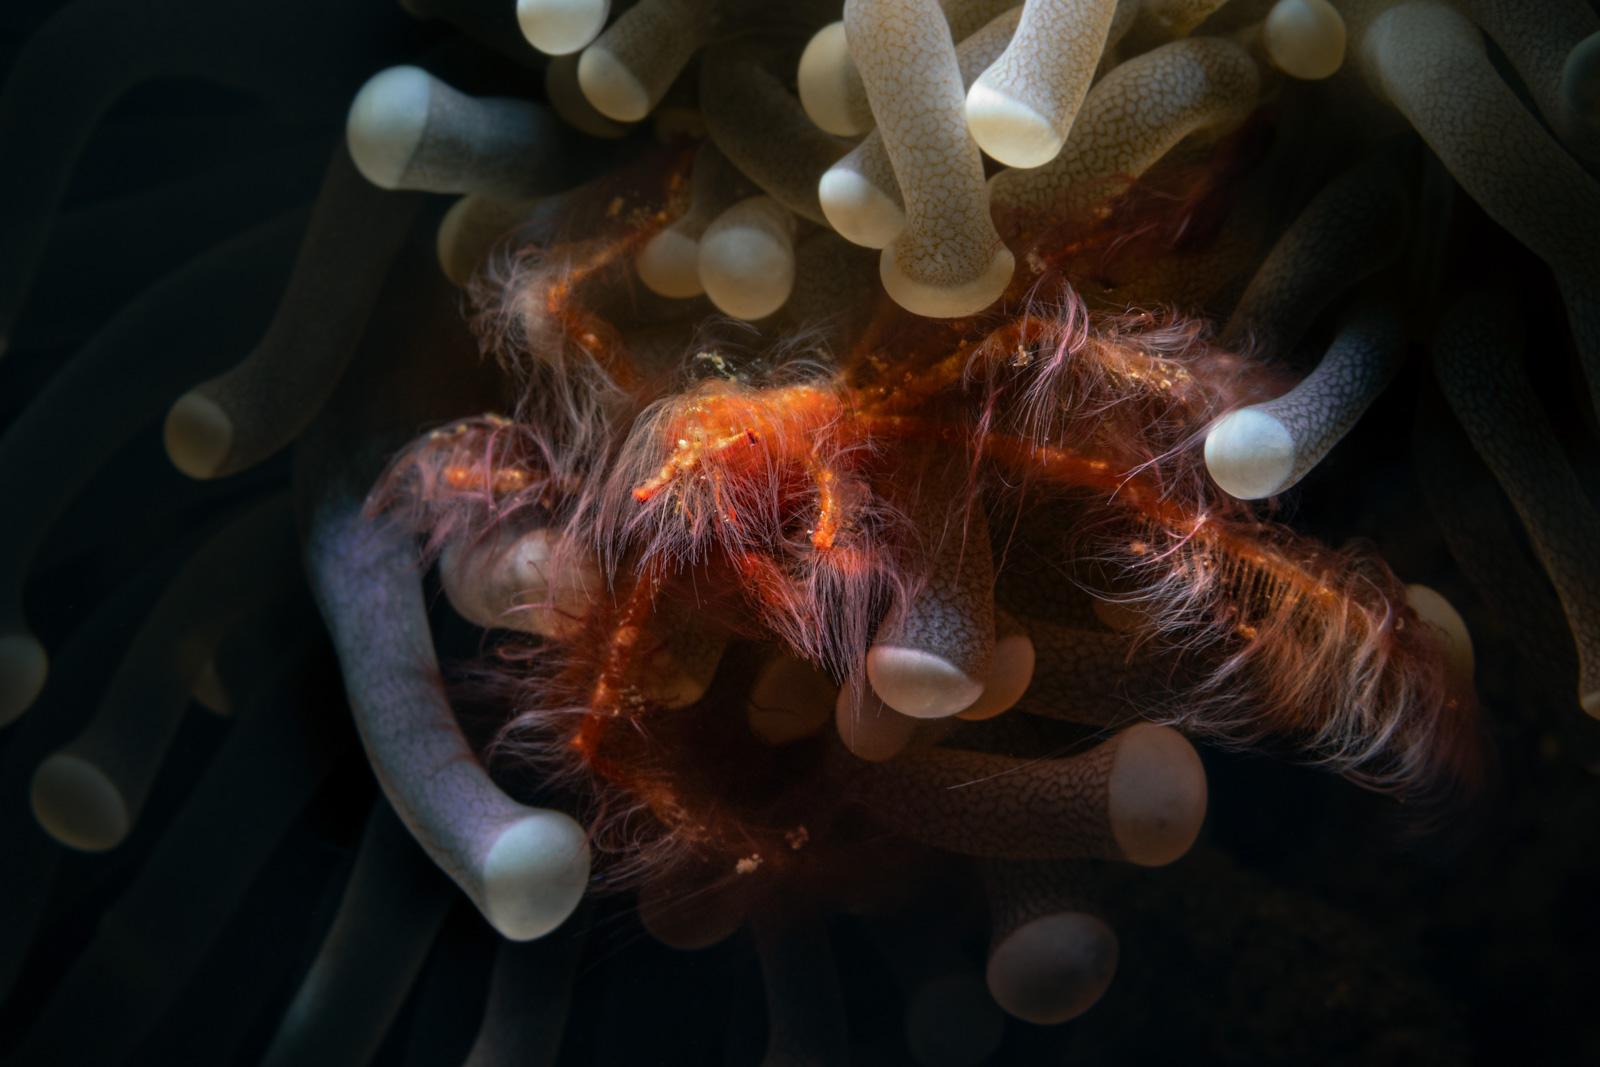
How to aim one when it has no laser
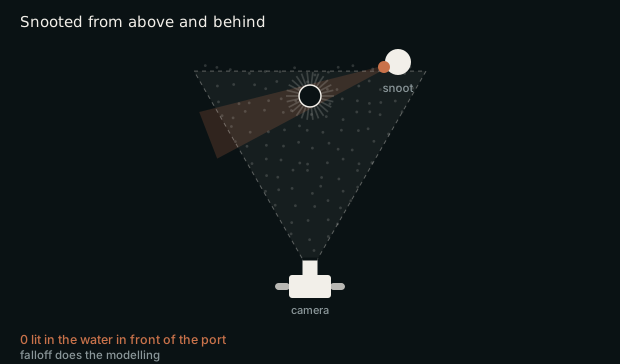
The section above says the first dives with a snoot produce almost nothing, which is true and is not much help. The method is this. At the start of the dive find something that will hold still, a rock will do, and set your focal distance on it, then lock the focus so the working distance stops moving. Take a picture. Play it back and look at where the light actually landed rather than where you thought it would. Adjust the snoot slightly, shoot again, and repeat until it is lighting the subject the way you want. Then leave it alone: the aim is calibrated to that working distance, and the distance is what you were really setting.
The other half is the angle, and it is a choice of shadow rather than a rule. Texture comes from one light, from one side. Move the strobe and the shadows move with it; a snoot is a single source from a single side, which is why these frames have texture at all, and the moment you add a second strobe or a fill light the shadows you were relying on soften. From directly above, at ninety degrees, the light describes the top of the animal, and any error in aim shows as a bright disc beside it. From about forty-five degrees the light rakes across the surface, the spines and the hair separate, and a small miss still lands somewhere useful. Neither is wrong. They are different pictures.
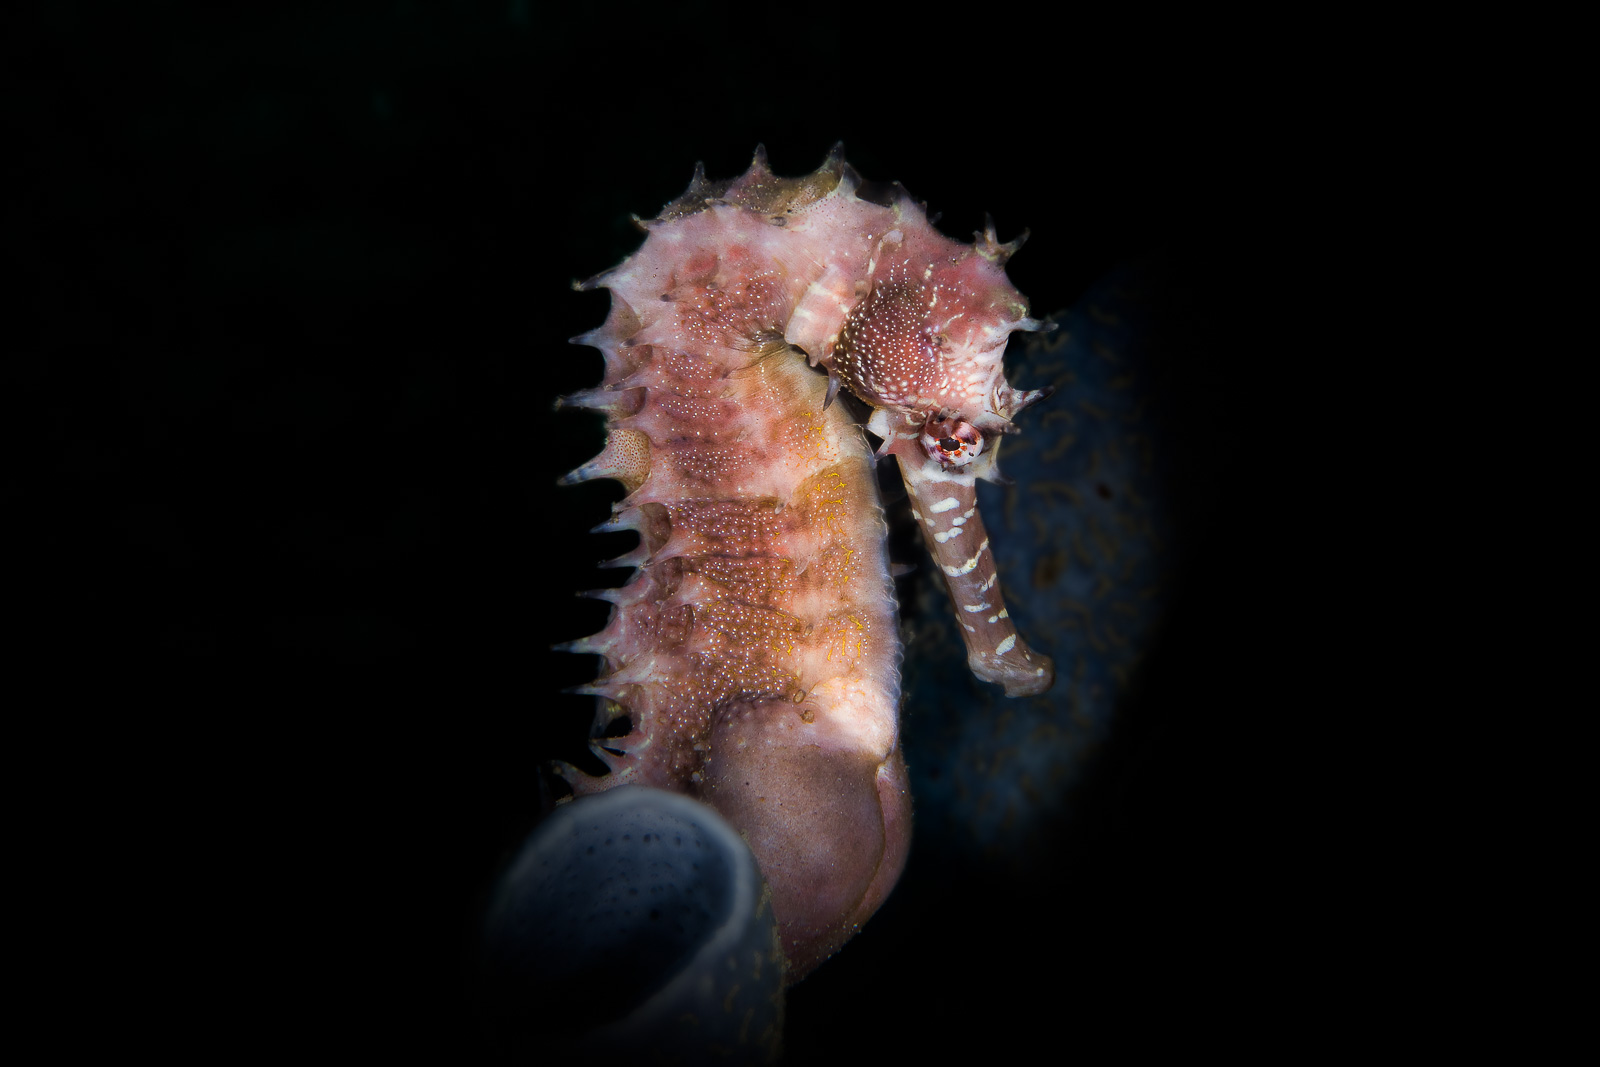
Power was never the thing that was missing
It is worth looking at what the industry sold as progress over twenty years. Guide numbers are quoted on land, so treat them as a scale rather than a measurement, but the direction is clear.
Two stops of output across two decades, and the genuine improvements in that list are not the power at all but the toroidal lens killing a hot spot and the controls you can read at thirty metres at night. Reach for the Maxi and you can hold a reef scene from further back than any of the others allowed, which introduces the exact backscatter and blown-highlight problems the extra distance was supposed to solve.
The frames on this page were not made by a strobe. One was made by moving two of them somewhere the manual advises against, and the other by putting a tube on one and turning it down. Both decisions cost nothing. Go and take the light off the axis of your lens, accept the specks, and see what the sides of your subject look like when something is actually lighting them.